Aug 13, 2011

Dine In

We got a big new dining table recently and it's my dream dining table. What makes it my ideal table? It's solid (oak to be exact) - which means it's not going anywhere or will it tip over when you lean on it; it's round - which means no one sits at a corner; and can be extended to accommodate a bunch of people when needed, up to 8 or 10 (depending on how close everyone wants to be); it has a pedestal stand - which means no outside legs for anyone to straddle. Unless that's your thing of course, in that case don't dine here.


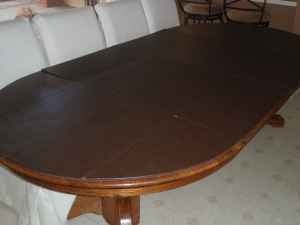
It also came with a table pad shown in the last photo, but I'm not sure what to use that for? Is that for card games? And if so, why do you need a pad to play card games?

I love my new table! I can envision homework sprawled out messily during finals, yards of fabric strewn across it for sewing projects, curtains being ironed (if I actually ironed them, does anyone actually do that?), piles of laundry folded on it, intense rounds of scrabble or bananagrams that couldn't be interrupted, and of course large feasts with friends and family (if they lived near).

And even if none of the above occurs, I just love that I could imagine it. Because it could.

I know that oak isn't really in fashion right now. Or old fashioned, traditional dining tables. Or even clunky wooden furniture. But I love this new addition - makes our house feel more like a home. Do you have a piece of furniture you feel the same way about?

Jul 13, 2011

Rotten Apple (tree)

I'm extremely late in posting this but one of our spring projects was trimming our apple tree. The right side was not sprouting any leaves and when we touched it, the branch nearly fell off.


We decided to use our trusty sawzall to trim up the tree a bit.

Or a lot.

While the beau was cutting, I was chopping the branches into little bits:

Into our new outdoor fireplace.

And our old fire pit.

And the rest we chucked behind the fence :)
(don't worry, it's still our property)

Jun 22, 2011

Keep Cool

It's almost July and we still haven't turned on our air conditioner (except a couple times here and there on rogue hot days).

Our southeast (I think) facing house tends to stay cool and this year hasn't been as hot as last year so far.

But I think these are a big contributing factor as well:

Not the guy, but the window he is standing next to. And 8 others windows like them. We've been using our heater less this winter and less this spring and summer as well. And saving on average about $10 each month on our gas bill.

Keeping this up for several decades and the windows would have paid for themselves!

Mar 17, 2011

For Japan with Love


Images from time.com


Feb 15, 2011

Under Foot

It's been a while since the last bathroom update so a lot has happened. Let me catch you up.

We removed the tile floor, toilet and tub and discovered that the subfloor had water damage. Then we discovered that the floor wasn't even properly supported for tile to begin with. So out the entire floor went:


The pipe in the wall is the plumbing vent. The towel is covering the toilet drain. The exposed wood beams are the joists above our newly remodeled kitchen. See how thin the plywood subfloor is?


This is where the sink vanity was.


This chaos is our bedroom.


The old bath tub standing up in our bedroom.


View into the master bathroom. It. Is. A. Work. In. Progress. Ugh.


New drain pipes for the toilet so that we can reposition the toilet away from the tub. One of them is backwards though. Whoops.

Another surprise was a joist in the way of moving the toilet over. We don't mess with structural beams so we were extremely lucky that we were able to move it over under the joist.


This is what we used to join pieces of the A.B.S. drain pipe that we cut to size. I like to refer to it as "Weld-On Abs". Wouldn't it be great if such a thing exists?


Welding action shot.


New position for the toilet. Moved over about a foot to allow room for the new (and wider) bath tub.

What has not been shown are the countless trips to the hardware store, because of all the times we messed up welding the pipes (third try was a charm though!). Certain pieces are hard to find and eventually were found at a large plumbing specialty store nearby.

Also not shown in the photos is how difficult/scary/frustrating working in a bathroom with no floor is.

Feb 1, 2011

Game Plan: Master Bathroom Update

We made some small changes to the game plan:
Going with a fancy tub spout


Adding a slide bar to the shower


Instead of the Delta Lahara or Addison faucet, we got the Kingston Brass Concord

A hose for the slide bar and shower head
Adding a niche to the tub surround


Adding a handshower to the slide bar
Bathroom plumbing is way more complicated (and expensive) than we thought.

Jan 28, 2011

Standing Aside

The current master bathroom project has spilled into the master bedroom:


That is our old bath tub standing on it's side in our bedroom. I've lost count on how many times I've stubbed my toes on this. Or how many months it's been sitting there.

Jan 27, 2011

Smooth as Glass - part 3

(continued from here and here)

Here is the finished product, with windows screw into place, vinyl trim on the inside installed, and aluminum coil wrap on the outside.

Some caulking they used.

Expanding foam they used.

And the empty bottles of caulk they went through.

There you have it. In depth documentation of our window installation. Is it as interesting to you as it is to me living with them?

Jan 26, 2011

Smooth as Glass - part 2

(Continued from here)

More windows screwed into place.

The second crew arrives in the black truck, consisting of 4 guys.


They fill in the gaps between the new windows and the opening (what is this called?) with spray expanding foam.

Here is what they used to cover up the foam around the windows. It's called "coil wrap" which had us totally confused when we signed up for this. I thought coil meant twirled metal like a spring or a slinky. And felt too silly to ask such a naive question. Anyway, I get it now, it's just a big sheet of aluminum that comes in a giant coil.

The older crew guy (that dad I believe) took the measurements for the coil wrap.

Behold! Our old windows. Sayonara suckers.

Trimming the coil wrap. Some cool contraption attached to the side of the truck. I learned that this is not sold to the public, only to contractors. So glad we did NOT DIY this!

Installing coil wrap. This is by far, the most time consuming aspect of the entire installtion.


Stay tuned for part 3!